Saturday 28 December 2013

Busiest December Ever!

I have been extremely busy lately. In fact, this month may be the busiest December of my life. Visitors, a graduation, an orientation, a renovation, a wedding all in the same one crazy month! Before I quickly go back to my home renovation, I wish you all a very happy New Year filled with the most joyful days of your life and thank you each and every one of you for supporting and following me here on my blog, as well as on my facebook page.

Enjoy my home decor inspiration photos below.


home decor

home decor ideas

house decoration

ideas for bedroom

house decoration


backyard ideas

study room

study room ideas

bookshelf

children's bedroom ideas

home renovation ideas

soft toys

home decor

home improvement

dining table

cushion ideas

bedroom

kids room

chair

bedroom ideas

Wednesday 4 December 2013

DID YOU KNOW ...? (75)

Cat
Photo Source
Cats -like many other animals- have three eyelids on each eye, an upper and lower lid just like us, plus a third lid that looks like clear plastic. The third eyelid comes in from the side to further protect their eyes from harm such as dust and keeps their eyes from getting dry.

Thursday 14 November 2013

HANDMADE POTHOLDER

I have been pretty quiet recently as I have been even busier than usual and also had some temporary health issues. The exciting Melbourne weather continues to be surprising and it is almost inevitable to be not sick during these extremely inconsistent weather conditions. So, we have been having our share of the cold and flu as a family as well for a while now. 

potholder2

I hope to write about the beautiful story of the top two fat quarters in the picture below as well as many other fabrics that will make your mouth water in another post in the future. Today, it is about a little quilting project of mine.

Sewing

Since I was at home with a sore throat and was unable to do much, I thought it was a great opportunity to work on a new project to distract my attention from the pain and also do something that did not require using my voice. So, that is how I decided on working on a potholder. 

Quilting


The inspiration came from the little pretty potholders by NanaCompany. Just like almost everything else she makes, Amy's potholders looked too pretty not to be inspired by. Her tutorial is pretty easy to follow even for a beginner. I changed a few details about it though to suit my needs better (made it smaller as I found the measurements used in Amy's tutorial to be too large for my liking and also used a lace instead of a ruffle. I also changed the back fabrics to calico and skipped any extra decoration as I love the blue floral fabric and wanted it to stand out). 

I don't have a walking foot to use for quilting. If you are like me, you can just sew straight lines in both directions as seen in pictures (they make diamonds) to hold the batting in place well. It also looks pretty in my opinion.

It was an enjoyable project for me. The most challenging part was adding the binding around it (not where the pocket to put your hand is, I am talking about the long one that covers all the raw edges around it).

I cannot wait to make more potholders as soon as I get my hands onto some insulated batting in the near future!

Have you ever quilted before? If yes and if you have it online, send us a link. Looking forward to seeing your quilt!


potholder1

Tuesday 29 October 2013

TUTORIAL: Rolled Stuffed Leaves

Just recently, I was talking to someone about what we stuff. We stuff, zucchinis, zucchini flowers, capsicums, silverbeet, dried eggplants and vine leaves. I am now looking forward to trying my hand at stuffing cabbage and leek. I wonder if there is anything else that we could stuff that we haven't tried yet.

The last time, I shared with you a tutorial to show you how you can stuff your (silverbeet) leaves in a triangular shape. To access to the tutorial which includes the preparation of the leaves, the stuffing, the cooking method and more, you can click here.

This time, I am sharing the easiest method of stuffing leaves with you; rolling. The pictures say it all but if you have any questions, please ask in the comments section below.

Enjoy!

Silverbeet leaves

stuffing leaves

recipe: how to stuff leaves

tutorial on how to stuff silverbeet leaves

stuffed silverbeet recipe

rolling silverbeet leaves

stuffed silverbeet

making dolmas


Saturday 26 October 2013

TIP: Whitening Socks

Photo Credit
As it is well known to us all by now, white socks start changing colour in time. To whiten them once again, boil them in lemon and water mixture.

Sunday 13 October 2013

DID YOU KNOW ...? (74)

Cat
Photo Source
Cats use their whiskers to feel if they can fit through a small place, like a hole in a fence. If their whiskers fit through, they know their body will, too.

Monday 7 October 2013

A Photography Challenge

Less than a couple of weeks ago, I put my hand up for a link party, my first ever linky party to be exact. The lovely lady, Ipek, from Hep Yesil blog invited us all to a photography challenge. The idea was to photograph what made us happy or what inspired us over a period of time. Here is my contribution.

Day 1 (Mon, the 30th Sept): 
Scooting around

My son, who has recently turned 5, wanted to have a 'boys' time alone with his father. He is surely growing up fast! Soon after my husband came home from work they went out together. It was the first time Mr. Junior had ever been to a cinema. They watched the 'Planes' at the cinemas, played some games, bought him some plane toys and dined out. My son had popcorn which he didn't enjoy much and hubby ended up eating it all. Meanwhile, Miss Junior, who is 2,5 years old, wasn't impressed that she was left behind and was upset for a while. It was a windy day but I took her outside regardless. We ran around, went for an egg hunt and she also went on her brother's scooter. She only learned to ride the scooter the day before. She was quite happy by the time we came back home after that.

Day 2 (Tuesday, the 1st of Oct): Lost chicken flyer

Miraculously, we found our lost chicken after her disappearance almost two weeks ago! We had registered her as a lost pet with the council, talked to some of our neighbours, and gone around looking for her in the first days. Later on, we printed out some flyers and with the kids, we walked around in our neighbourhood and dropped them off in mailboxes as well as at a nearby fast-food store while a lovely friend of mine, a beautiful lady from the same community helped us out by putting up some posters at local shopping centres and the vet. We got a call from a lady who happened to be one of our neighbours saying that she found the chicken in her garden and kept her for a week. When they found her, she was cornered by their pet dog and both the dog and the chicken had no idea what to do with the other. They were both afraid of each other (luckily!). They let her out in the garden during the day and kept her in the laundry at nights. When they lost hope in finding the owners, they gave it to a priest friend of theirs who had other chickens. Once they saw our flyer in their mailbox, they called us using the number we had left. She then arranged it with their friend who returned our little 'girl' safely. She is now a bit quieter than usual but seems to be healthy and happy to be back at home.

Day 3 (Wednesday, the 2nd of Oct):reversible bag and pencil cases by MADE BY  Y

We had yet another windy and rainy day. It was quite cold too and we chose to stay at home today. I had the motivation to make so many things but only had the time to complete a few craft projects. I definitely enjoyed working on the reversible tote bag but I think I am addicted to making pencil cases these days.

Day 4 (Thursday, the 3rd of Oct):Some drink and dessert

We had a great time meeting up with some friends over a cup of coffee.

Day 5 (Friday, the 4th of Oct):breakfast and a bib by MADE BY Y

A good friend of mine that I met during my postgraduate studies years ago, who also coincidentally became a colleague a few years later, was over for breakfast but we had such great time that we ended up spending most of the day together. I find our conversations to be inspirational, fun and real with her every time we are together. After such a beautiful day, I also had a great night. A handmade item of mine was sold soon after a showcase that I participated in commenced.

Day 6 (Saturday, the 5th of Oct): french knot cushion cover and bib by MADE BY Y

After getting my son's haircut and also going to one of his friends' birthday party, I indulged myself in finishing a brand new project, a cushion cover, and also a bib that I had started a few days ago. I must admit, as much as it can get a bit painful to work with french knots, a part of me is in love with them.

Day 7 (Sunday, the 6th of Oct):renovation ideas - study and bedroom

I am definitely not the best person to handle sleeplessness well. I had a late night on Friday and today, I have started feeling sick. It is very likely that my immune system weakened and I will be suffering from a mild case of cold for a while. Well, it is not too bad for the moment. So, I still did most of the things that I was hoping to do today; weekly shopping with the family and working on ideas for a minor renovation at home. We also had our first 'family movie afternoon' today. It was quite fun except the fact that our little daughter slept halfway through and our preschooler son was not really impressed with our choice of movie. It was a totally different feeling for us to be able to sit down and watch a movie with our kids and we definitely made the most of this great experience.


Wednesday 2 October 2013

Homemade Cereal Mix

My children love their weetbix bars for breakfast and at least 3-4 times a week, they have them. I always try to mix them with some fruit and nuts but it can get quite time-consuming especially when in a hurry. Instead, I have recently made a mix that I add to their weatbix bars along with milk. I often change the variety but just to give you an idea, here is one of our homemade mixes.


Ingredients of the mix in the picture above (from top to bottom):

Pine nuts
Spelt flakes
Peanuts
Goji berries (wolfberries) (you can read more about them here)
Quinoa
Pepitas/pumpkin seeds (read more about them here)
Sunflower seeds
Almonds
Oats
Raisins and cranberries

Enjoy!

Monday 30 September 2013

Triangular Shaped Stuffed Silverbeet Leaves

As I have mentioned here in my stuffed zucchini recipe post, we truly enjoy a variety of stuffed vegetables, dolmas, as a family. Just recently, a lovely lady from our local community, who has become a friend, happily shared some of her delicious vegetables from her plot in the community garden with us. The colours and the smell of all those vegetables and herbs were just divine. I just had to put everything aside and make something with the fresh produce as soon as I was given them. The first thing I did was to make something that my mum used to make for us when I was a child; triangular shaped stuffed silverbeet leaves. I actually make our stuffed leaves in two shapes and this is the harder shape to form. Stay tuned for a tutorial on the other way of stuffing leaves. 

Ingedients:

Silverbeet
Onion
Tomato paste or diced tomatoes
Medium grain rice (about 1.5 - 2 teaspoonsful of rice for each leaf)
Ground mint
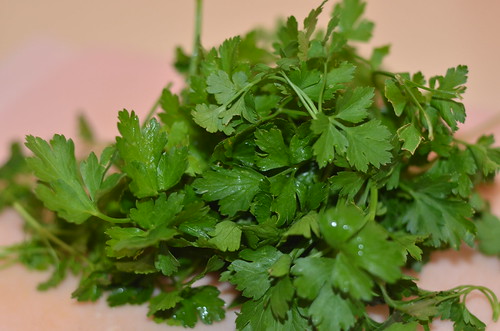
Fresh parsley (optional)
Water (boiled)
Salt
Black pepper (optional)
Olive oil

Method:

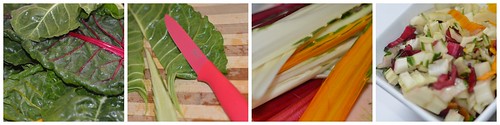
Wash your silverbeets. Separate your silverbeet leaves from their stems as shown in picture below. Don't throw away your stems, they make and add flavour to many delicious meals, which I will be sharing with you at the end of this post.

stuffed silverbeet step1

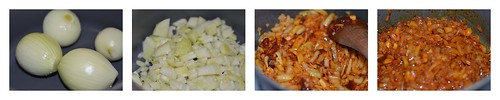
Dice your onions and cook in some olive oil and tomatoes or tomato paste until the onions are nice and soft.
stuffed silverbeets step2
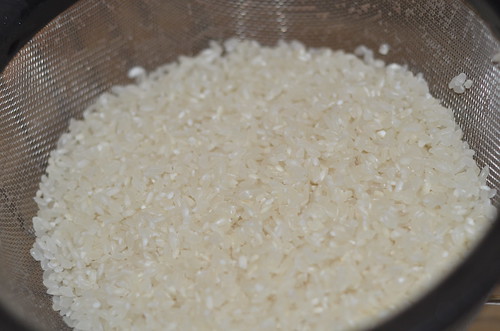
Wash your rice well.

Rice - stuffed silverbeet


Chop your fresh parsley.

DSC_5685

Add your rice, salt, pepper and herbs (mint and parsley) to the onions and mix well. Add a small amount of boiling water, close the lid, turn off the stove and let it absorb the water.

In the meantime, boil a generous amount of water in a large pot and then put your silverbeet leaves in it. It takes only some seconds before the leaves soften. Once the leaves are softened, (approximately 30 seconds) put them in a strainer to drain the excess water off.


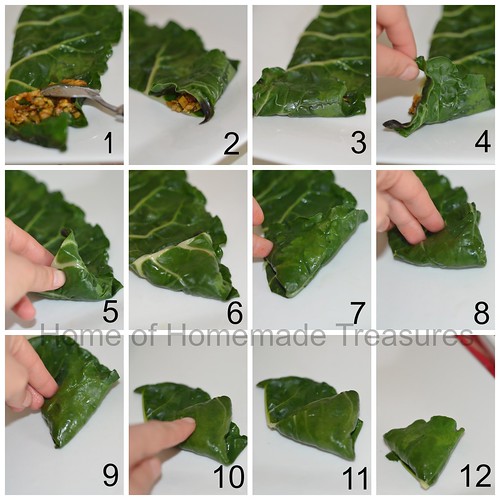
When the leaves and the stuffing are cool enough for you to touch comfortably, you can start making your dolmas. The pictures below show you how to make them step-by step. Just a reminder though that you will need to cut the leaves in half lengthwise, following the stem line. In other words, each leaf will make two triangle dolmas (if the leaves are really big, you can them in half and that will make four triangles from the same leaf).

Now, here is the details of the arts of making triangular shaped dolmas:

1. Put about a teaspoonful of stuffing on top of the 'wrong side' (the one with the more visible veins, the back of the smooth side) of the leaf close the larger end (which is where the stem was originally).

2-3-4. Fold the outer side of the leaf and place it on top of the stuffing, all the way to the inner edge (from right side to left side of the leaf).

5. Fold the leaf back onto the outer edge (so, it is folded from the left side to the right side).

6-7-8-9-10. Keep repeating the folding action each time to the opposite side (first towards the inner edge, then towards the outer edge and so on). This action is crucial in making the triangle shape.

11. If there is any small bits sticking out, fold them in and keep going as usual until the end.

12. Congratulations! Your first triangle is ready. I know it sounds like hard work but once you get the hang of it, it actually is enjoyable and is not really that hard. It also looks so much more pleasantly different to the usual rolled stuffed leaves.

stuffed silverbeets step3

Note: You can either cook your dolmas soon after you make them or pack them into freezer bags and store away in your freezer until you are ready to use them. They make great 'fast' food as it only takes about 20minutes to cook after this stage. When you come home later than expected or are too tired to cook something, instead of opting for nutrition-poor alternatives, you can just take this out of the freezer and while you are washing up and changing, your delicious and healthy meal will be pretty much ready. 

To cook your dolmas, place them in a pot. Add boiling water to it about an inch or two below the dolmas' level. First cook in high heat until the water boils. When you see that the water is boiling in the pot, turn the heat down and let it cook for approximately 20 minutes and then voila! Your meal is ready. Natural yoghurt compliments it really well. 

Before I say goodbye for now, let me quickly give you some ideas on how you can use the stems. I am sure there are many people over the world who could give you many recipes for them but what I generally use them for is as follows:

A) Dice and add to stir-fries.
B) Dice and add to vegetable soups.
C) Dice, lightly boil and make a mixture with some ricotta cheese to cook in pastry.
D) Dice, lightly boil and leave in the freezer until needed.
E) Dice and leave in the freezer until needed.
F) Dice, boil until soft, and leave aside while cooking some onion in oil and some tomato paste until the onions are soft. Once they soften, add the stems, add some salt and chilli flakes and cook for about 5 minutes. You can either eat it as is or you can crack some eggs on it and eat after the eggs are cooked. This particular recipe is one of our favourite silverbeet stem recipes. 

Enjoy some nutritious homemade food today!