Showing posts with label Homemade Treasures for the FAMILY. Show all posts

Saturday, 15 July 2017

'Thanks for Being a Part of My Family' Party

Recently, I have been to Steve Biddulph's 'Raising Boys' seminar in Melbourne. He gave lots of examples to prove his points but one of the most 'stuck-to-mind' details for me was on how families have changed over time and how it shows its effects on different units of the family, wider community and the world in general.


Regardless of what a family is to people these days or how families are formed, the concept of a family is important to individuals' lives and the world's today and the future in general. I'd like to think that my children also know the importance of a family.


I have been extremely quiet in the social media world including here on the blog recently and it has taken me over a year to be able to post something that is actually from the last year or even perhaps the year before. However, as I was going through my 'drafts', I didn't want to pass this without sharing.


This day symbolises to me that 'being a family' is special to my children and that they are happy to be a part of our little family perhaps as much as we are. It holds a very special place in my heart that my little preschooler at the time asked for a party to celebrate the fact that we are a family and it is something to celebrate. The party/theme was called 'THANKS FOR BEING A PART OF MY FAMILY' as the kids wanted it.


The kids simply guided us on what kind of a celebration they wanted to have and since food is quite important to us, one of the highlights was naturally related to food. Kids chose the menu themselves and the photos above are some shots from the foods we shared on the day. There was also some gift giving that they sneakily added to the list of 'to-do' for the party and of course they had their own preferred 'gifts' that were listed too, which I had previously shared.

I hope you all appreciate whatever you have and you do show your appreciation in a way that suits you the best!

Monday, 15 February 2016

Lunchbox Ideas (7)

Yes yes, I know. It has been ages -and felt even longer!- since I was able to post anything here the last time. Even though it might have looked like a big break here, it was actually a very busy period for me. Life was in its full swing on this side of the planet for sure.

The new school year has started a few weeks ago Down Under and even though I love spending time with my children during school holidays and that we all really enjoy not having to rush in general; reality has already kicked in and we like it or not we have already adapted to our school-day routines well.

Below is some more inspiration for your in case you are looking at healthy variety and are happy to try new recipes and combinations. You can find the links to the previous lunchbox idea posts at the bottom of this page. Enjoy!

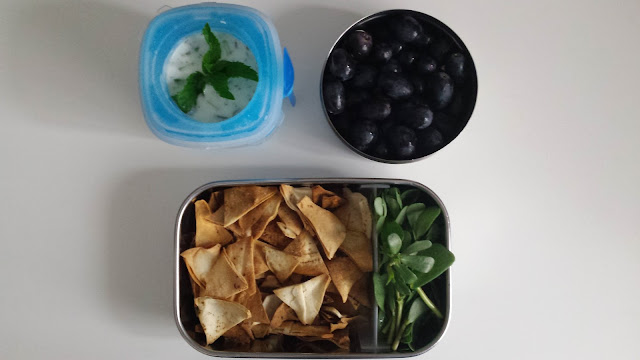
1. Lunch and snack:
* Cucumber dip (finely chopped cucumbers, natural yoghurt, a small pinch of salt, some dried mint and some fresh mint leaves for decoration).
* Flat bread chips (Lebanese/flat bread cut into triangle shapes and toasted until crisp).
*Purslane (Never underestimate this edible weed. It is full of Omega 3 just to say the least. Read more about it and get some recipes here)
*Grapes
healthy lunchboxes for kids


lunch ideas


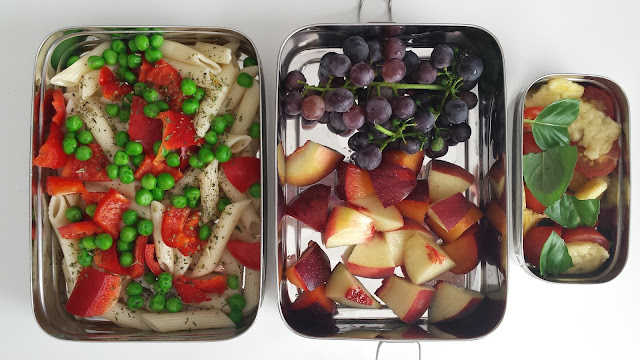
2. Lunch and Snack:
*Pasta salad (pasta made from the night before. In the morning, I added some raw red capsicum, lightly blanched peas, and some dried mint. Feel free to add your favourite seasoning).
*Fruit salad (fresh garden grapes, some plum and nectarine slices)
*A salad (toasted halloumi, home-grown cherry tomatoes and home-grown basil leaves)
homemade food ideas for kids

healthy snack ideas for lunchboxes

3. Lunch and Snack:
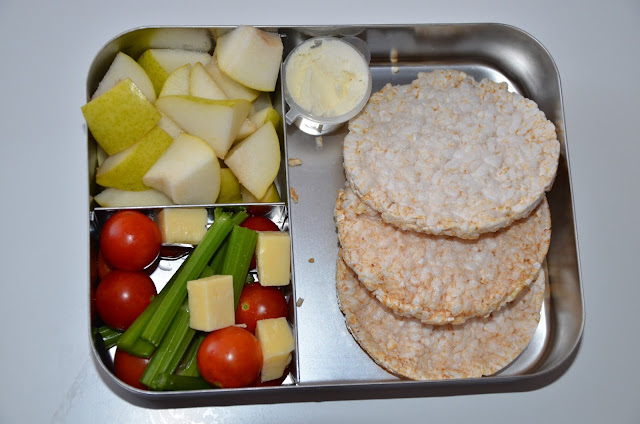
*Some organic rice crackers and spreadable cheese
*Home-grown celery sticks, homegrown-cherry tomatoes and mozzarella cheese cubes
*Pear
Lunchbox ideas by home of homemade treasures

4. Lunch and Snack:
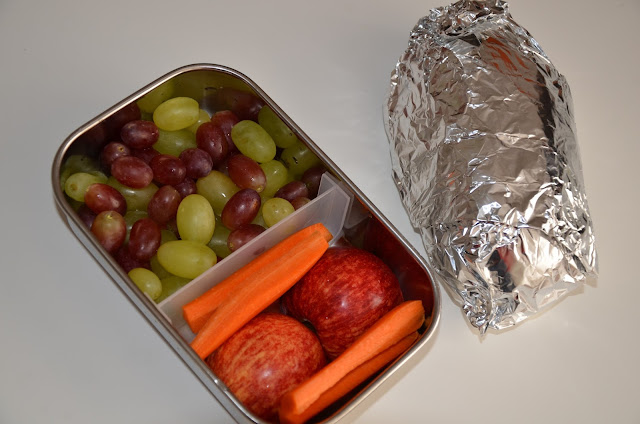
*Sandwich (meat balls, green salad eaves, cucumber slices and spreadable cheese) (in a foil wrap in the picture below)
*An apple (cut in half)
*Carrot sticks
*Two types of grapes
Homemade lunch for school lunchbox

Healthy lunch ideas for kids

Previous lunchbox ideas for you to check out:
#6
#5
#4
#3
#2
#1

Sunday, 26 January 2014

A No-Sew Makeover in Half an Hour: DIY Chair Cover

No-sew upcycling project

Here is my no-sew project from the other day: a new DIY swirl chair cover. It took me less than half an hour to come up with this beauty!


Office chair makeover


The chair works perfectly fine but the cover on it was a bit boring and not in its best shape in my opinion. So, I decided to try my hand at re-upholstering it and I must admit, this has been one of my most favourite upcycling projects to date. I am just in love with the outcome!


What I used was a staple gun, a hammer (to hammer the staples down when/if they were not in properly), a screw driver and my choice of fabrics.  (Depending on how your existing chair is assembled, what you will need to use may differ. Eg. Allen key instead of a screwdriver).

Fabric options

The process was quite straight forward. I simply took the screws off the backing on the seat and the back support, separated them using some muscle power, stapled the new fabrics on them making sure that the fabrics were well stretched(I chose not to remove the original cover on it), attached the back pieces back on, put the pieces together again and voila!

Re-upholsterings swirl chairs

How to renew an old chair

Re-upholstering office chairs


The whole procedure took us approximately half an hour. It is a perfect and very affordable way of adding some colour to your home or jazzing up your room.  


Swivel chair make over

There is nothing like having something that has your (or your loved ones') touches all over it at home. It just is so unique and special. 


DIY chair cover


Enjoy the beauty of some personal touches in your life today!


Thursday, 16 May 2013

ROOMING-IN

Some of the most important benefits of rooming-in after the birth are as follows;

* Allows the mother to respond to baby quickly,
* More likely to successfully breastfeed, 
* Better connection between the mother and the baby,
* The risk of jaundice for the baby is decreased,
* More sleep for the mother.

Monday, 14 January 2013

VINEGAR AS A CARPET CLEANER

To clean some small and mild stains on your carpet, use half a cup of water and two table spoonsful of salt and clean the carpet with this mixture. Leave it to dry before vacuum cleaning the area.

Wednesday, 28 November 2012

VINEGAR FOR BAD ODOUR

To get rid off bad odour from rooms, fridges, cars, drawers etc, wet a slice of bread with vinegar and leave it there over night.

Wednesday, 31 October 2012

TIP: Cleaning Pen Marks from Walls

To clean your pen marks on walls, simply use a piece of cloth or sponge and some vinegar.

Monday, 22 October 2012

HOMEMADE WATER FILTER


The video above shows how to make a water filter at home. In my opinion, it doesn't seem to be much complicated and it would be good to know how to make your own water filter in case of an emergency.

Thursday, 18 October 2012

USEFUL INFORMATION ON BROCCOLI

Whole broccoli
Photo source
Broccoli is classified as a super food and is one of the healthiest vegetables that is easy to access to for most people especially in most parts of the globe.  It is a cruciferous vegetable and belongs to the cabbage family (similar to cauliflower, bok choy, kale, turnips, radishes, watercress and brussel sprouts). Cruciferous vegetables in general and broccoli in particular has some chemicals that may reduce the risk of colorectal and other cancers, and may also act as anti-oxidants and may boost detoxifying enzymes in the body. Even though there is need for more research in the area, it is claimed that diets high in cruciferous vegetables are linked with a lower risk of certain types of cancer.

Nutrients and health benefits:
  • very high in vitamin C
  • rich in vitamin A
  • has high levels of carotenoids (vitamin A like substances)
  • high in fiber (consumption of large amounts of fibre-rich foods may cause gas and should be reduced or avoided in people with diarrrhea and some other colon related problems)
  • has generous amounts of calcium
  • rich in folate (which may be helpful in prevention of some birth defects and to avoid heart disease and strokes)
  • a source of phytochemicals, or plant chemicals, that may have anticancer properties
  • loaded with antioxidants
  • very low in fat and calories

How to Choose, Store and Consume:

The broccoli heads should be firm and compact. Broccoli should be dark or bright green to purplish in colour and has closed flower buds. Stalks should be cleanly cut and firm too.

Broccoli is not suitable for dry storage. It should ideally be stored at 32F with the humidity of 95%.

Broccoli
Photo source
If you have some unprocessed broccoli, then store it loosely covered to allow respiration. Do not wash it unless you are going to use it soon after washing it. Do not store broccoli close to ethylene (ripening element) producing fruit and vegetables such as pears, cantaloupes, avocados and onions. Do not store broccoli in the fridge when wet. Use cut florets within 2 days.

If you are going to freeze your broccoli, then cut it into florets, blanch it for two minutes and cool down to 41F before packaging and placing in the freezer which can stay there for up to 3 months.

Broccoli can be consumed raw or cooked. It can be purchased fresh or frozen. It can be cooked whole or broken into florets. It has the most nutrients when eaten raw. If cooking with the stems, cut through thick stems to allow even cooking. You can steam, boil, or pan-fry broccoli. Some people even microwave it. Do not overcook broccoli and make sure it still retains the bright green colour even when cooked.

You can use broccoli in many types of meals but our two favourite cooked broccoli dishes are broccoli salad and broccoli soup. Then comes vegetarian stir-fried noodles with some broccoli along with a few other types of vegies or stir-fried mustard seeds with broccoli.

We often eat the stem raw. We just peel off the tough skin around it and cut it into slices or finger length strips. It is crispy, juicy and has a fresh taste.

When Mr. Junior started eating solids and was safe to eat broccoli, I used raw broccoli stems or lightly boiled broccoli florets as a finger food or a snack for him. He has always enjoyed it and he much prefers raw or very lightly blanched broccoli to casseroles or omelettes with broccoli. When I am preparing broccoli to make a soup with for example, he always tries his tricks to get some uncooked pieces of broccoli off me before I use them.


Wednesday, 3 October 2012

GUEST BLOG ENTRY: Felt Owl Tutorial

Today's entry comes from Sedef Imer, who is about to have her second child any minute. After sending her many thanks for her great work and very valuable contribution, and wishing her the best of luck with the birth of her daughter and motherhood in general, I am leaving you with her post. Enjoy!


***
I am an ex-investment banker-management consultant-chartered accountant (basically high flying career girl lol) originally from London but had a complete lifestyle change when my husband and I moved to Adelaide in 2009 and then had our first baby. I am now a proud stay-at-home-mum and also pregnant again and due to have a little girl in October. I have discovered and fallen in love with crafts and sewing recently, a total lifestyle transformation.

I got into felt work about 6 months ago after a friend showed me the activity books she had made for her kids 20 years ago. I just had to make one for my boy, as you simply cannot purchase those at the shops! I am completely self taught, thank god for google and you tube tutorials... Currently half way through making a felt activity book for my toddler (who is now 19 months old). About 2 months ago I bought my first sewing machine and started learning how to use it, so I am diversifying from felt. So far, I have tried my hand at relatively easy stuff, mainly making decorations for the new baby's nursery - bunting, cushion cover, rag doll etc. Next, I have a simple quilt planned for my little girl.

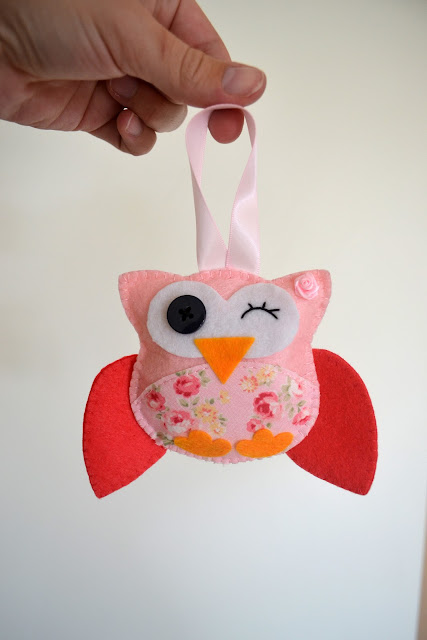
This tutorial covers how to make an ornamental felt hanging to decorate your baby's nursery or a child's room. It also demonstrates basic principles of felt sewing which can easily be replicated for other animals or other types of decorations.

Step 1 - Find an image that you wish to turn into a decoration. If doing this for commercial purposes always check with the owner of the image if they give you permission to use it! This is a felt owl image I found on google, nice simple lines. It doesn't have to be the picture of a felt object, any simple vector or clipart would also work. You can also draw your own (sadly I am not talented enough in this department, so I resort to technology) ;)

Felt owl
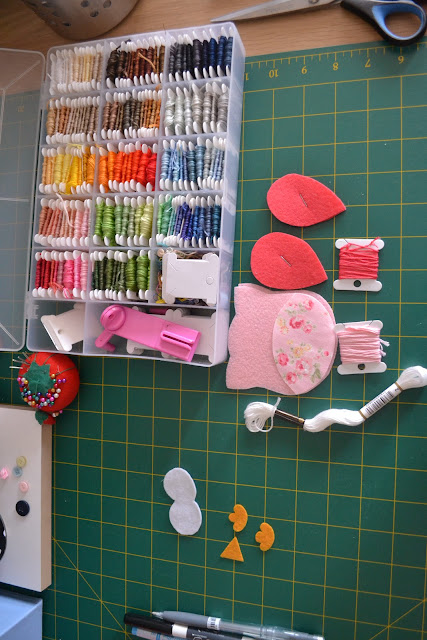
Step 2 - Gather and prepare your materials and tools:
- Felt for the body, belly, and wings (whatever colours you want), white felt for eyes, orange felt for feet and beak (and black felt if you can't find a black button the right size for the eyes)
- Scissors
- Craft glue or hot glue gun
- Pins or stapler

- Embroidery thread in matching colours and sewing needle (embroidery needle if you have one, it has a larger eye than a regular sewing needle)
- Filling material (hobby fill or pillow filler, even cotton wool will do)
- Black button for the eye(s) and 3 buttons to decorate the back

Felt owl
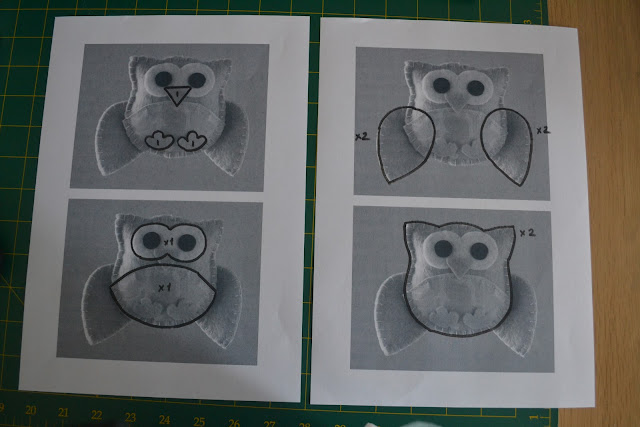
Step 3 - Using whatever software you prefer enlarge the picture to the size you want your finished product to be. Mine is about 10cm tall. I use Adobe Illustrator for patterns. The page size i use is A4 so I know the exact size the owl will be when printed & templated. You can also use photoshop, even powerpoint. Or get it enlarged with a photocopier :) I put two owls on a page as i will need several of these for the patterns, so to save on paper.
felt owl

Step 4 - Print enough of the owls so you have a pattern piece for each 'element' of their body, and trace around the various body parts with a felt pen.
felt owl

Step 5 - Roughly cut the patterns out (not on the line, but slightly out)
felt owl
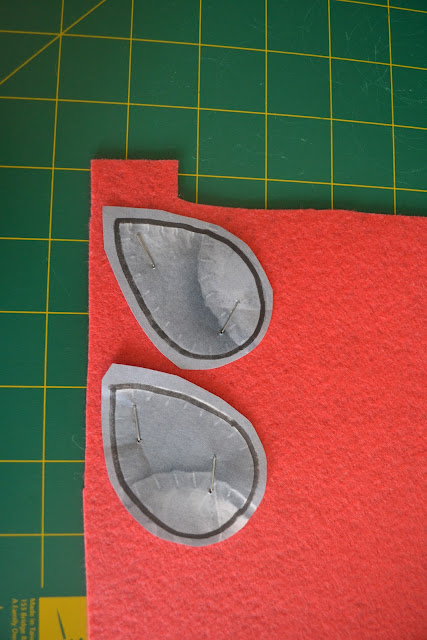
Step 6 - Pin or staple the patterns onto felt. I prefer staples (just an ordinary stapler) as they lay flat on the felt and produce a better more precise finish on the cut piece. But normal sewing pins will do too.
felt owl

Step 7 - Cut on the black line. Tip: For cutting out smaller pieces like feet and also pieces with curves like the eyes - i find it easier to use a pair of curved nail scissors for those

Felt owl

felt owl

felt owl

 All pieces are now cut and ready to stitch/assemble.

Step 8 - Get your matching embroidery thread. I used three colours - pink to match the body, strawberry to match the wings, and black for the eyes. All my thread is in an organiser box but the white skein is how they come
.
felt owl
  
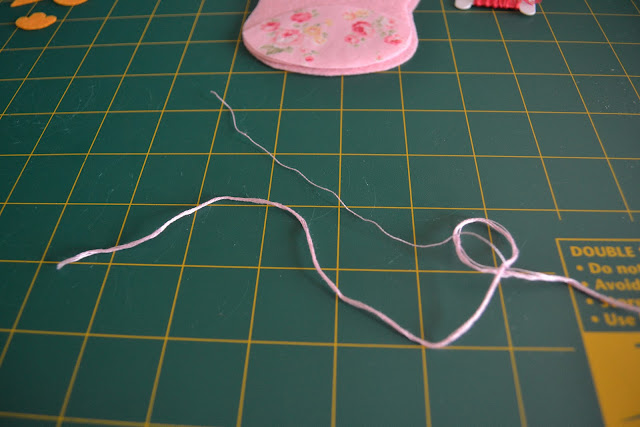
Step 9 - Warning - only use 1 strand from the embroidery thread, not all 6! Some people prefer to use 2 strands to make the stitches stand out, you can even use a contrasting colour (lighter/darker) of thread to make them stand out more. I prefer mine to blend in as much as possible so I use one strand of matching colour. If you are making a larger ornament, you may want to use more strands.
Keceden baykus

Step 10 - We now need to prepare each 'side' of the owl before stitching them together. Starting with the front. I decided to use fabric for the belly so stitched it on to the felt using backstitch (google it if you dont know how to do backstitch, it's very easy). If you are using felt you can just glue the piece on, no stitching required. You can also glue fabric on if it is a darker colour fabric, but the glue may show under a lighter colour fabric.
Felt owl

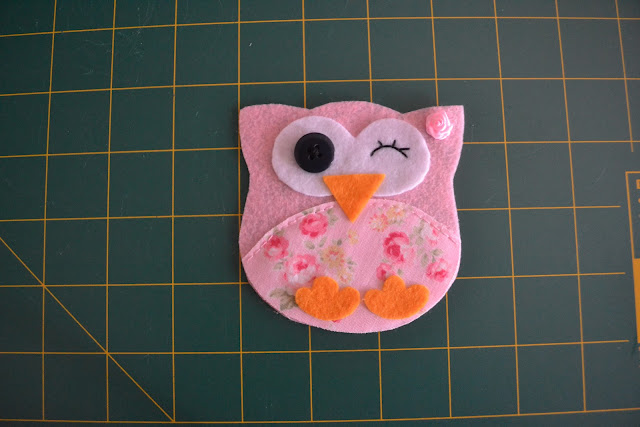
Step 11 - Glue the eyes, beak and feet on. I also stitched a little fabric rose that i already had to make it extra girly ;) I just use craft glue, any liquid glue or hot glue gun will be fine.
Felt owl
  
Step 12 - Eyes. Sew on the black button. If you are making a winky eye, you can either draw it on with a felt tip pen, or for a more professional look embroider it on. I first drew on the winky eye using a water erasable pen (you can just use a pencil or pen even, as the stitches will cover the pen mark)
  
Step 13 - Embroider small backstitches following the pen line to make the winky eye. I used three strands of black thread for this as one strand would have been too thin. I then dabbed a bit of water on top to get rid of the blue from my pen. And voila the front is finished.
Step by step felt owl tutorial

Step 14 - The back. Staple or pin the wings where you want them. WARNING - make sure you staple them on to the correct side of the felt, as the pattern is unlikely to be symmetrical!

Felt owl

Step 15 - Blanket stitching the wings onto the body. Before you attempt this cut two small pieces of felt and learn to blanket stitch. This is a good tutorial. http://www.futuregirl.com/craft_blog/2007/09/tutorial-hand-sew-felt.aspx It is dead easy but you dont want to practice on the owl! Start blanket stitching the wings wherever you wish.
Felted owl

Step 16 - as you stitch around the wings, you will eventually get to the body. Just keep stitching it as if the body isn't there, putting the needle down through it and back up where you want it to come. The wings are now stitched on.

Felt owl

Felted owl

Step 17 - Sew 3 decorative buttons on to the back which i think is a nice touch. Both front and back now finished and ready to stitch together!
Step by step craft

Step 18 - Blanket stitching the front and back. When you get to the wings, make sure you dont sew through them as the stitches will show on the wings! Just push the wings back a bit with your hand and pretend they are not there.
Felted owl tutorial
  
Step 19 - Blanket stitched all the way around except a 3cm opening at the top (for the stuffing). I just left the thread and needle hanging to finish the stitching after filling.
How to make a felt owl

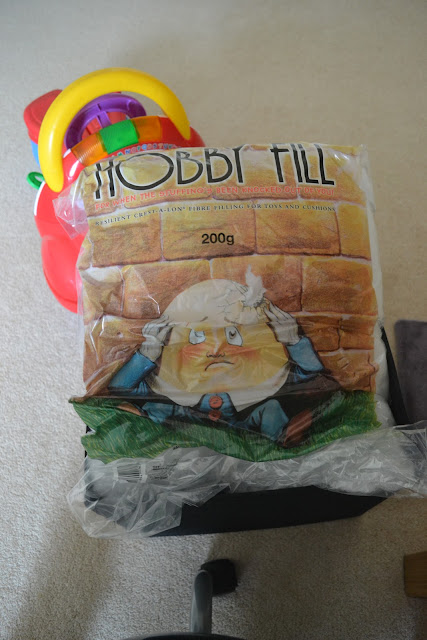
Step 20 - Get your filler material. This is the one i use, they come in $3 bags from spotlight. Excuse my toddler's toy car in the background! :)
How to make an owl
  
Step 21 - Stuff it in using a pencil and your finger, push into all the nooks and crevices. I found the ears were easier with my fingers.
Easy felted owl
  
Step 22 - Put a ribbon through the opening on top before finishing the blanket stitch.
Easy crafty tutorials
Voila! A cute little owl to decorate your kid's room :)

Felt owl

Felt owl

Note: Soon after Sedef wrote this post for us here and had her second child, her beautiful daughter, she launched her own business pageshop and blogGreat work Sedef! 

Monday, 1 October 2012

Monday, 3 September 2012

TUTORIAL: DIY Canvas

I am totally in love with this design and the idea in general. It is such a fun little project and a great way to add something personal to your home decor! Choose your own colours and themes and go with it.

DIY home decor

Click here to access to the tutorial. 

DIY wall hanging design and tutorial

Photo Credit: http://www.weddingwindow.com/blog/2012/07/23/diy-chevron-heart-wall-hanging/