Friday, 30 November 2012

FOOD DESIGNS (8)

Source unknown

It is arguable that people should 'play' with food or not but regardless, I believe that some people are really artistic and here are some examples of it. I wish I could find the sources of all but unfortunately, I was unable to. However, my respect goes to all the people behind these designs. 
Source unkown
Source unknown
by Takashi Itoh
by Shawn Feeney
by Takashi Itoh
Source unknown
Source unknown
by Shawn Feeney

Wednesday, 28 November 2012

VINEGAR FOR BAD ODOUR

To get rid off bad odour from rooms, fridges, cars, drawers etc, wet a slice of bread with vinegar and leave it there over night.

Monday, 26 November 2012

STUFFED ZUCCHINI (COURGETTE)

Here in Australia, we have started to really feel the summer recently. Many things change with seasons (not that we have real 'seasons' in Mebourne!); energy levels, weekend programs, clothing, colours, business items, types of plants that are grown in the garden and so forth. Food is not any different. It changes quite a bit too as different vegies and fruit become available in season, different levels of calories and other essentials are needed, preferences change with the season etc.

In regards to food, in our case, we are normally quite happy with our natural yoghurt and eat it on a regular basis throughout the year. However, especially when it is warm or hot, it surely becomes one of our 'must-have' types of foods. We don't necessarily follow a particular diet at home, however, we do prefer certain cuisines over some others and the Mediterranean cuisine is one of our favourites for sure and youghurt generally goes well with it.

We sometimes consume yoghurt as is or even make a quick wrap or a dip with it, sometimes it compliments and accompanies other foods, such as stuffed vegetables and it does it beautifully. We stuff a lot of vegies and today, I will be sharing with you our recipe of stuffed zucchinis (note: there are variations of zucchinis and the ones in the pictures here are better known in Europe).

This recipe is a vegetarian recipe. However, it can be made with minced beef as well. If you are an omnivore and would like to know how to make it with meat as well, it is very easy. Just cook the beef with some onion (and alternatively with some tomatoes or tomato paste) and then the rest is the same as below.


Ingredients: 

2-3 zucchinis
1 medium onion
Approximately 1.5 bowlsful of short or medium grain rice (you can use bulghur/cracked wheat instead)
A tablespoonful of paste (optional) (You can use tomatoes instead of paste)
Ground mint
Salt
Cracked pepper
Olive oil (approximately 2-3 tablespoonsful)


 Method: 

For the stuffing, caramelise your chopped onions until brown (you can add your paste or tomatoes at this stage or right after the onions are caramelised) in shallow oil. Add rice, mint, salt and cracked pepper and stir it for a minute or so on high heat. Pour some hot boiling water on it (about a glassful) and turn down the heat. Close the lid of the pot and let it simmer until the water is absorbed.

To prepare the zucchini, cut your zucchini into about 2-3 equal pieces horizontally (this depends on the size of your courgette) and then cut about a 0.5cm (or a bit over) off from each piece to be able to close each stuffed zucchini with. Carve the insides of your zucchinis (there are tools designed particularly for that purpose but if you don't own one, just use a teaspoon and carve it with that just like scooping icecream of a tub). You don't need to waste that bid. Just chop it up and add it to the stuffing mixture or add it to your soups. The walls and the bottom of the zucchini  should be about 0.5cm in thickness for it not to break. Once they are ready, put your stuffing in each piece until almost full (not too full though as it will expand a bit more while cooking) and close them with the pieces that you have cut from each one.

Place them all in a pot horizontally (it is more desirable if you use a shallow pot as opposed to using deep ones), pour some hot boiling water (perhaps about 3 quarters of the zucchinis should be under water) and once it boils, turn down the heat and leave it on low heat until cooked. It takes less than half an hour to cook.


Enjoy something that makes you think of summer today!

Saturday, 24 November 2012

DID YOU KNOW ... (47)?

colossal squid
photo credit
 The largest eyeball ever recorded in history belongs to a colossal squid. Colossal squids have the world's biggest eyes.

Thursday, 22 November 2012

A HANDMADE SIFTER FOR THE GARDEN

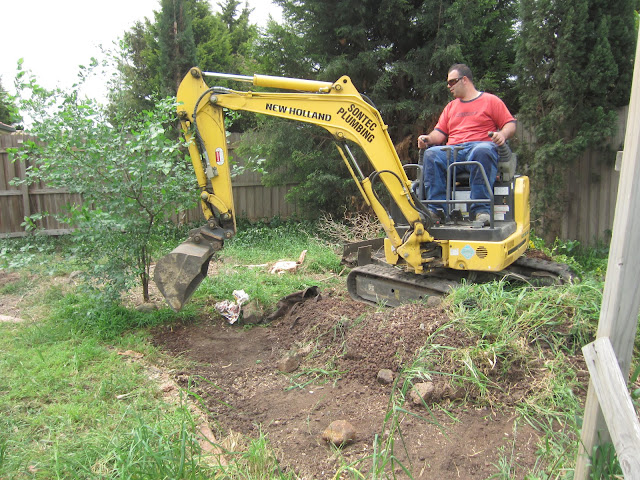
Digging up the garden
We thankfully worked with Sontec Plumbing. They were great. Recommended: 0409 695 927


As I have mentioned here, there are things happening in our backyard this year and we are excited about it all as a family. There will be other posts on other aspects of what is going on there and what we have done or learnt throughout this process. Today, here is one of Mr. Hubby's ideas and our handmade tool that worked wonderfully for us.

Digging up the soil

As you know from my previous post on our garden that we have some stones and rocks on the sides of our backyard along with the fence and we wanted/needed to take them off from there and use them elsewhere. There were four reasons for that: 1) We need to dig up some parts of the garden and the stones are very hard to work with when doing so. 2) Where we are planning to dig up the soil, stones are unneeded and are not welcome. 3) We need all those rocks and stones elsewhere. 4)We have enquired about some walk in bins to take all that dirt away from quite a few places and the quotes for a 6-8 cubic meters walk in bin started from approximately $300 and went up to around $600 which too made us think of other possible options.

Dirt with rocks

Mr. Hubby is a person with bright ideas and can think outside the box. He is skillful too which is a great advantage on our behalf. He started thinking of possible solutions (can you tell he is an engineer?) and voila! This is what we did on the same day after he suggested it:

Working with a drill

Instructions to make a sifter for the garden

We bought a metal mesh for about $20 from a local hardware store. We came home and got working. We picked some pieces of wood that would work well for our little project from our little 'unwanted-for-the-moment' wood pile, took our drill set and some nails out out, and started to make our rectangle metal sifter. We kept one side's two wood ends a bit longer to make it easier to lift it up when heavy.

DIY sifter

We placed the sifter on top of the wheelbarrow that we have borrowed from a family member (which we should really give back sometime soon).

Working in the garden

The rest was pretty straight forward. We loaded the sifter with dirt using a shovel, sifted it through our handmade sifter, most of the soil and some small sized beneficial rocks went through and went into the wheelbarrow, we separated the big chunks of branches, twigs and grass roots and the rest stayed on the sifter which we then poured into buckets to make it easier to transport.


Rocks and stones


During this work which went for over a week on and off, Mr. Junior was very helpful finding all sorts of bugs and worms and informing us of his new findings. As a person who would not go to his Grandparents' house unless they make sure that their pet dogs are locked away or on leash, he did really well with bugs and all those slimy little creatures!

Verimli toprak

As for Miss Junior, she helped us out with the rocks the most by making sure that we did not miss any unwanted bits in the rocks section. She was an excellent supervisor and a worker. She inspected the rocks that we collected in a container in detail and whenever she didn't like it, she took them out of the container and put them on the ground so that we would know we needed to do it again, this time, more carefully.
Separating stones from dirt

Once again, it was hard work but was well accomplished and we surely had a smile on our face when it was all completed.
organic potato


We even found some surprises in the garden where they were least expected! 

Tuesday, 20 November 2012

TIP: HOMEMADE GROUND MINT

Nane
Mint from our garden
If you leave your mint to dry in the sun, your homemade ground mint will go dark and won't look as good. Instead, do it indoors and it will look greener.

Saturday, 17 November 2012

DID YOU KNOW ...? (46)

newborn
photo credit
Most newborns cry without tears until they are three to six weeks old.

Friday, 16 November 2012

TIP: Removing Stickers

Use white vinegar to take off stickers (from toys, glass, car windows etc). First, wet the corners of the sticker with some vinegar and then using a hard piece of card (bank card, telephone card etc), start taking it off.

You can use more vinegar for the rest of the sticker and use a soft piece of cloth to take off anything that is left on the surface. First make sure the vinegar stays on the surface a bit before you clean it with the cloth.

Wednesday, 14 November 2012

AN ARTWORK IDEA USING TWIGS

kids recycled arts and crafts
A masterpiece by Mr. Junior
Here is another simple, yet fun and educational activity for your young children or students. We made this a few months ago and the inspiration came during one of our walks.

It was a day when we had many days when the sun was much missed and was shining shyly that we went out for a walk as we usually do. Mr. Junior was on his bike and Miss Junior was sitting in her pram. As usual, we had quite a few stops when especially Mr. Junior stopped to look at his new discovery of something or examine a bug or collect some rocks or twigs. This time, he decided that there were many tiny branches on our way that were screaming to be used for arts and crafts. That is how they found our way home: all chosen and picked up carefully by Mr. Junior and travelled on top of the sun shade of his bike.

After he had his afternoon nap, he was excited to get started with his new masterpiece-to-be-born. He collected all the 'tools that he needed' (as he says it), put his smock on and sat down. He wanted to stick them on paper and I suggested that we make some shapes with them. He was happy with the idea and asked me to draw a circle for him. The rest was mostly his own work and he is still very proud of it and it still stays on the display area (on the fridge).

There are many skills that this activity requires and helps develop such as some mathematical skills, spatial skills, comparison, patience, focus, pre-school skills such as hand-eye coordination, decision making and more. Walking, recycling/re-using and collecting are only some bonuses of the activity.

Materials used:
twigs of various sizes (both length and width)
a piece of paper (we used recycled paper)
glue
a pen/pencil to trace a shape (optional)

We used a 'controlled' type of method where the shape was decided on and were drawn prior to the activity however, depending on your expectations from the activity and your child's readiness, skills or wish, you can choose not to include it. He can enjoy designing his own artwork. This can also be turned into a frame and you can use fabric instead of paper if you prefer to. The twigs can be painted too. The other possibility is that you can use this activity as a support to his other learnings (e.g. smallest to the biggest etc) or he can write letters (or writes his name) using twigs in the same way if he is working on the alphabet and so forth.

Enjoy something that the Nature offers today! (and you are very welcome to share your own versions or the masterpieces of your children once your little ones come up with them)


Tuesday, 13 November 2012

Coming Up Soon

There is a new giveaway planned on the blog. Applications are now open for sponsorship. Interested businesses are welcome to e-mail contactmrslucky@gmail.com and enquire about the details.

Monday, 12 November 2012

GUEST POST: Weet-bix Snack Balls

Today, we have Sabrina from Milk Me with one of her many mouth-watering and healthy recipes here. I have to mention that she has been such a pleasure to work with. Now, I am leaving you with her entry. If you too try her recipe, please feel free to share your variation and pictures on Milk Me's blog, facebook page, here on the comments section or on my facebook page

***
Hi! I’m Sabrina. I’m a mum, a wife and the business owner of Milk Me.  When I’m not working on Milk Me, I’m usually hanging out with my kids and hubby, picking up after them,  cooking for them, picking up more of their mess.... well you get the gist of it.... ;-)

If you want to read more about milk me read here http://milkmeorganic.blogspot.com.au

So when Home Of Home Made Treasures invited me to do a guest blog I jumped at the opportunity to share my home made healthy treats.  I LOVE food but unfortunately after 2 kids, “Calories” and I just don’t get along so well anymore.  We use to be good friends (days when a late night KFC pitstop was a normal end to a Saturday night) but now all it seems Calorie wants to do is leave traces of fat on my hips.  So to curb this issue I have with that nasty thing called “Calories” I create sugar free, guilt free healthy treats for my family and I.

This is a recipe I made up all because my son never wanted to finish up the crumbly bits at the end of the Weet-Bix cereal box.   And the results......... a Winner Healthy Treat!  Here’s the recipe if you want to try it.  Look... it’s no Chocolate truffle but it’s also not laden with any unwanted unhealthy calories


Weet-bix snack balls

Ingredients: 
1 cup of crumbled Weet-bix
1/4 cup dates (chopped finely)
1/4 cup almonds (chopped finely)
1/2 cup shredded coconut
1/4 cup shredded coconut (to roll the balls)
1 tbsp honey or agave syrup
2-3 tbsp water

Method:
Mix all ingredients well.

 Roll into balls (wet hands make it easier to roll the balls) and roll in coconut.....
(hint: add more water if the balls are too dry. Alternative to dates put sultanas instead)
It’s never lasted more than 1 day in my household

If you want to see more sugar free healthy recipes visit me on www.facebook.com/milkmeorganic.
For details on Milk Me Organic products visit www.milkme.com.au


Saturday, 10 November 2012

DID YOU KNOW ...? (45)

red light
Photo credit
On average, people spend 2 weeks of their life waiting for a traffic light to change.

Thursday, 8 November 2012

PREPARING A QUICK GARDEN BED

We are extremely excited about our garden this year as we have taken the plunge and decided to make some changes in the garden. I will be posting more on our garden and what we are doing there this year but for today, it is about one of our garden bed preparations and a very useful tip on it. 

The sides of our backyard along with the fence (perhaps a few meters from the fence) have some small rocks and we can't really use our lawn mower there properly. We have also been quite busy (as usual) recently and as a result of it all, we have just let go of the grass and have ended up with something like this in the first picture on the sides of our garden. 

Garden bed tips

One day only a couple of weeks ago, we decided to make a vegie patch there and we wanted to make it immediately. Mr. Hubby borrowed a van from a family member and bought some untreated wood (sleepers) after work the day before we made this garden bed. The next morning was a Saturday and we went out for some grocery shopping. On the way to the shops, we visited a few local garden suppliers and ordered 2 cubic meters of dirt with some organic matter in it (Note: The price for the same amount of the same or a very similar quality soil varied from $53AUD to $67AUD per cubic meter in three different but physically close-by places!). We did our shopping and came back home in the early afternoon. After we put our two little fruits of love to bed for a nap, the delivery truck arrived with the soil. We surely didn't have the time to clean all the grass on the ground but there was no reason to stress about it. Here is how we went about it and what made it stress-free for us:

cardboard boxes in the garden

All we did was that after we placed our sleepers, we put some thick cardboard boxes that we were happily given at a local hardware store on the ground, on top of the grass (even though initially, we did try to pull the grass off and take the small rocks from there to use them elsewhere. However, the rock collecting method that we used was not practical enough and did not work there, so, we gave up on that).

bahce yapimi

You don't need to cut your grass as after you put your cardboard boxes and the dirt on it, your grass will die anyway (since there is pretty much no oxygen, no food, no drink).

tips on vegie patc making

It surely took longer for the four of us (of course with the little helpers when they woke up) to carry all that soil from the front yard to the garden bed than preparing the foundation and the frame of the garden bed. However, it was all worth it and we all felt a great sense of accomplishment at the end. No whingeing from any of us at all and it only took an afternoon to have this:

vegie patch preparation
Not too bad, ha?

Have a great time with some loved ones today!


Monday, 5 November 2012

RECIPE: Cauliflower with Garlic Sauce

cauliflower salad

If you reside in a country in the southern hemisphere just like us here in Australia, you too are likely to be taken your summer foods recipe books out or wandering on the internet trying to find some summery recipes to top up your own list of hot days foods menus. 

I always love it when I learn something new regardless of whether I try it or not. I love looking at recipe books with good quality pictures and drool but often decide that they are too complicated for me.  I like limitless amounts of good food pictures, smells and tastes but when it comes down to making something, I often prefer something that is healthy, delicious and easy to cook (and clean afterwards of course). Therefore, my recipes that I have handwritten or saved on my computer generally consist of foods that are practical and healthy. 

Here is a five minute side dish recipe that will compliment most main menus all year round even though it is best when consumed on a hot day as it is a cold dish. 

Ingredients: 

1 small/medium cauliflower 
1 bowl of natural yoghurt
2 cloves of garlic (you can change the amount according to your preference)
Salt
1 big tablespoonful of pepper paste (don't worry if you only have tomato paste at home as it works fine with that too)
Chilli flakes (optional)
Olive oil

Method:

Lightly boil the florets of your cauliflower (you can actually make some small slices with the stem and use them in this dish as well). You don't need to boil them more than a minute or two. As they are  cooling down, make a garlic sauce using your yoghurt, crushed garlic and salt by mixing them well. In a small pan, heat up oil, paste and chilli flakes. Place your cauliflower on a plate. Put your yoghurt on it and pour your oil, paste and chilli mixture on top of it all and voila! Your dish is ready. 

Enjoy something cool today!

Saturday, 3 November 2012

DID YOU KNOW ...? (44)

salyangoz
Photo credit
Some snails can sleep for three years without waking up (therefore without food). 

Friday, 2 November 2012

AN EASY ACTIVITY FOR KIDS

Easy activities using pegs

Here is another kids activity that does not require any materials that is unlikely to be around the house. All you need is a bunch of pegs (excuse the way my old set of pegs in the picture looks) and a plastic laundry basket. If you don't have a basket that has small bars where the pegs can be attached, you can use other options such as metal drawers (like the ones IKEA sells) or make a few lines with a rope in between two things (such as chairs-just make sure they are safe enough for your child) and use the ropes instead.

This activity is great because it keeps toddlers and preschoolers (and even young school aged kids) busy for a while and they can practise their fine motor skills as well as coordination skills while having fun. You can even encourage them to (or they may even choose to) color coordinate the pegs or come with a particular shape or design of their own which would mean even more skills. 
Kids crafts

Enjoy a simple yet fulfilling day today!

Thursday, 1 November 2012

BROCCOLI STEM FINGERS

 Here is another snack idea for you. It is simple, fresh and healthy.

What you see in these pictures is from a raw broccoli however, you can make the same using cauliflower as well. No more wasting the stems!

(Click here for further information on broccoli and its health benefits as well as some recipe ideas with it. )