Monday, 30 April 2012

A NAPPY CHANGE TRICK

As a mother of two, I know how challenging it can get to change a baby's nappy. If you are a mother or a father of a young child, there is no doubt you'd (or will in the near future) know what I am talking about. Here is one of the tricks that I use which does not fail me in most cases.

Have a colourful pair of baby or kids socks (or with an attractive pattern like a monkey face) on your baby's hands (no, there is no typo here. I do mean 'hands', not feet). In my case, Miss Junior mastered taking off her socks from her tiny feet in a few seconds a while back and it is not a 'long term' distraction anymore. So, at this stage, I generally cover her hands with a pair of socks and it often amazes her and keeps her busy for a while whilst I change her nappy. You may need to do it a few times until the operation (!) is complete but as long as your bubba is happy and it allows you the time to finish off the change, there is no problem with that!
Small metal bells
Small bells

Here is my favourite for you: You can make your own silly pair of socks particularly for nappy change times. You don't need to be a great tailor or a dress maker for this. As long as you know how to sew a button roughly, you are professional enough for this project. Just sew up a few buttons randomly or a face like details, small pieces of ribbons, one or two little bells that you can easily find at craft stores etc onto an old sock and during nappy change, put it on over your baby's hand. This will be a great distraction as well as a stimulant for your baby's development. If you like, you can make a few of different ones and alternate as your baby gets used to one.

Enjoy a day when you can change your baby's nappies easily :-)

Note: Make a silly sock and put it in your nappy change bag that you use out and about. This will make diaper change much less stressful when at the shops, in the car, at cafes/restaurants etc.


Saturday, 28 April 2012

DID YOU KNOW ...? (22)

Lemons contain more sugar than strawberries.

Friday, 27 April 2012

DIY CAKE STAND

Handmade cake stand

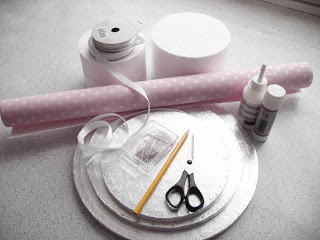
What a transformation of two simple styrofoam cake dummies into a stunning cake stand! For the step-by-step instructions, visit here.

Materials needed for DIY cake stand


Thursday, 26 April 2012

GLOWING BALLOONS

Balloon craft

This look can be achieved at home easily. It looks like all you need is simply to put a glow-stick in balloons. Well done to the original owner of the idea!

Wednesday, 25 April 2012

MR. HUBBY IN THE KITCHEN: Homemade Pancakes and Blueberry Sauce

Today is ANZAC Day, therefore a public holiday here in Australia. ANZAC stands for Australian and New Zealand Army Corps. If you would like to read more about it, here are some recommended links for you:

http://www.awm.gov.au/commemoration/anzac/anzac-tradition/
http://en.wikipedia.org/wiki/Anzac_Day
http://www.dva.gov.au/Pages/home.aspx

Today, we were able to have breakfast as a family and our menu was consisted of weetbix with blueberries (for Miss Junior), some homemade pancakes, a blueberry sauce and some fruit salad (for the rest of the family).

As I have mentioned in my writing titled 'Sunday Special' as well, we are so lucky to have such a talented and adventurous cook, Mr. Hubby, at home. He definitely needs a whole team of cleaners after him but lets leave it there as it is not today's topic.

Pancakes

This morning, we all couldn't get enough of his food once again. The recipe of his pancakes and blueberry sauce as well as some pictures are below for you.

Homemade Pancake

Ingredients:

  • 2 eggs
  • 2 glasses of milk
  • some melted butter (about 50g)
  • 1 teaspoon baking/bi-carb soda 
  • plain flour 
  • orange zest (optional)
  • some spray oil for cooking
Method

Beat the eggs until fluffy. Add milk, butter and bi-carb soda and start adding flour as you whisk. You need to aim for a creamy consistency and once you have it, no more flour is needed. 

Heat up your pan with a small amount of spray oil in it. Once hot, pour in some of your pancake mixture and cook it in high heat. When starts having some bubbles on it, it means, it is time to turn it upside down and cook the other side. It only takes seconds or a few minutes to cook a pancake, so make sure you don't walk away once you put it in the pot. We like it nice and thin. So, you may need to make a few of them per person. Best served hot.

Homemade Blueberry Sauce

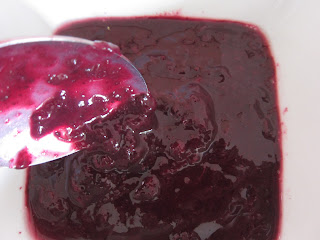
no-sugar sauce
Homemade no-sugar blueberry sauce
Ingredients:
  • Blueberries (we used organic blueberries)
  • Water (half the level of blueberries)
Method

Put the blueberries with a small amount of water into a saucepan and heat it up. Once boiled, you can lower the heat and simmer it for a few minutes until it forms a sauce-like consistency. Best served hot. 


fruit platter
Excuse the dirty plate please. This is Mr. Junior's plate after eating his pancakes. This is his own design.

Note: Have you noticed that there is no sugar or salt in any of the recipes above? Make your own and see if there is ever a need for any of it in these recipes. 


Tuesday, 24 April 2012

A STYLISH IDEA FOR PARTIES

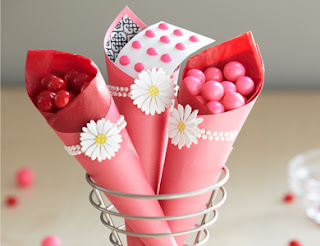
confetti cones

I found this picture on the internet and wanted to share it with you as well. As is, it is great and very stylish but you can alter it a bit if you wanted to. This is a great serving (and presentation) idea for parties. You can put many types of snack foods in them but personally, I would definitely go for some blueberries in them (you can make the cones smaller if needed)! They are not messy, the average size of blueberries is almost perfect and are a great treat for everyone!

Note: Check this out for a paper cone tutorial.

Monday, 23 April 2012

FOOD DESIGNS (1)

Fun fruit dishes

Sometimes it is only because they look good, sometimes it is because there is no other way to feed kids, sometimes because it is fun, functional or a way to express ourselves, most of us would choose to design our dishes at times. Here, I decided to share some ideas that either I have come up with or I have seen and loved with you. I hope you enjoy them all and you are very welcome to share your opinions or designs here or on my facebook page (Why Bee) (or) (MADE BY Y).


Sunday, 22 April 2012

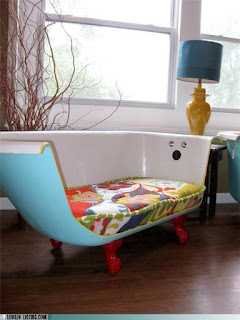
A RECYCLED BATHTUB

DIY recycled seat

There are so many people with so many great ideas and skills out there, don't you think?

Saturday, 21 April 2012

DID YOU KNOW ...? (22)

If the vast majority of babies were exclusively fed breastmilk in their first six months of life – meaning only breastmilk and no other liquids or solids, not even water – it is estimated that the lives of at least 1.2 million children would be saved every year. If children continue to be breastfed up to two years and beyond, the health and development of millions of children would be greatly improved. (Visit here for the source of this information and for further information)

Thursday, 19 April 2012

PAPER CONE TUTORIAL

stylish paper cones

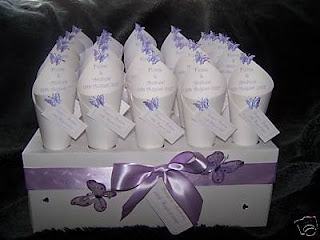
Paper treat/confetti cones are extremely easy and fun to make and they can be very stylish and functional. 


party ideas

If you would like to learn how to make the cones in the picture below, click here. The step-by-step instructions there will make this project even easier for you.

paper cone tutorial


Wednesday, 18 April 2012

DIY CUPCAKE STAND

easy handmade cake stand

Believe it or not, it is pretty easy to achieve a wonderful 3 tier cupcake stand similar to the one in the picture above. If you aren't convinced yet, let me point this out as well that this is not only a fun project, but it is also an inexpensive project too! Click here for the instructions.

cake stand

Tuesday, 17 April 2012

A FELT FLOWER TUTORIAL

The picture that I have found on the internet explains it all very well. It is another very easy tutorial with a great result.

DIY felt flower
This flower (or clover) can be used for decorative purposes to complete your furniture in your rooms (you can add some coloured strings or buttons etc), you can frame them and put them up on your wall, they can be used to make headbands or just add them to your child's dress.

If you make your own felt or fabric flowers, please share their pictures with us!

Monday, 16 April 2012

JERUSALEM ARTICHOKES

Just recently, as a family, we had great fun digging the dirt and searching for Jerusalem artichokes in one of our garden beds. It was real fun! Mr. Hubby was most useful doing the hardest bits such as pulling the big plants out of the garden and Mr. Junior was an excellent digger of the soil. Miss Junior was in my arms trying to get a hold on the buckets-full of Jerusalem artichokes for a taste-test and I was really good at spotting things such as new types of bugs, or a missed piece of Jerusalem artichoke.

jerusalem artichoke search
The first and the only time we ever planted Jerusalem artichokes was the last year. This year, it was a gift of the nature to us. We didn't really need to do almost anything to it. It performs well even if neglected. In our case this year, it grew on its own and left us kilos of produce to share with the loved ones.

They can be eaten raw or cooked but almost always we prefer them raw. We simply dig them up from the garden, peel and wash and eat. It is crunchy and is somewhat refreshing.

jerusalem artichoke picking


Lets now move onto the health benefits of Jerusalem artichokes. They are;

yerelmasi
  • similar to potatoes in some ways and may be used as a substitute to them. However, they do not contain the same type of starch as potatoes. They contain inulin which should not affect blood sugar levels. 
  • safe for diabetics to consume.
  • contain large quantities of iron which makes it very desirable especially for vegetarians and vegans.
  • filling.
  • high in potassium.
  • contain fiber, niacin, thiamine, phosphorus and copper.

Warning: Some people may find it hard to digest even though none of the family members in our case has experienced it. 

yer elmasi


Sunday, 15 April 2012

DID YOU KNOW... ? (21)

It is claimed that babies who are breastfed are generally healthier and achieve optimal growth and development compared to those who are fed formula milk.

Saturday, 14 April 2012

TIPS FOR PEOPLE WITH NAUSEA

The reason I thought about writing about nausea tips is that very recently, we have suffered from a virus or a case of food poisoning as a family. We have a strong feeling about where exactly it happened on one of our outings but it is a different topic altogether. Like my children's doctor suggested at the time, it is sometimes not as important to know the reason as to know what to do at times like that.

Some of the tips below are personal suggestions and some others are professional advice from experts.
  • Eat easy to digest foods (foods that are easy on the stomach)
  • Avoid big meals. Instead, eat in small amounts but eat more often.
  • Take your time while consuming foods or drinks.
  • After eating, sit up for a while as opposed to lying down.
  • Avoid foods or drinks that are too hot or cold.
  • Avoid foods that are greasy, fried or spicy.
  • Try to avoid preparing or eating foods that has a smell that bothers you.
Some foods and drinks that are easy on the stomach and therefore recommended when nauseous are; 
  • clear fluids such as clear broth (chicken, vegetable or beef)
  • clear liquids that are not fizzy.
  • rice cereal
  • oatmeal
  • crackers
  • boiled potatoes
  • yoghurt
  • cranberry or grape juice
  • tea
  • water
Here is one of our recipes  that we use to settle the stomach:

Ingredients: 

white rice
salt
water
lemon juice (optional but highly recommended)
ground mint (optional)

Method: 

Boil rice in plenty of water with some salt in it.  Squeeze some lemon in it and if you like, add some ground mint too.

This meal is filling, provides energy, is easy to eat and digest, helps with re-hydration.

Please feel free to share your personal tips or recipes for people who have nausea below in the comments section. 


Thursday, 12 April 2012

A VOCABULARY ENHANCING ACTIVITY

This is one of the techniques that I used to use as I was doing some self study on a language during my university years. I was trying to learn French but I was aiming to learn only the spoken language for practical reasons at the time. A good friend of mine was quite  fluent and accurate in that particular language, French, and he was kind enough to help with especially vocabulary. I used to learn words and their meanings (as well as some grammar points) from him and then using my own strategies, I used to memorise them.

Below is one of the methods I used and found helpful then. It can be used for whichever language you are trying to learn and it is practical and easy. You can also use this technique for phrases, idioms, opposites or synonyms too.

Just cut up some blank double sided paper into squares. The size is upto you but I believe that 8x8cm should be appropriate enough. On one side, write a word (or an idiom or a phrase) in the language that you are trying to acquire and on the back of it, depending on your level, write the definition/explanation/synonym/ in either your native language, especially if you are a beginner, or in the same language as the one you are trying to learn. Then, fold it in half and then fold it in half again. So, it becomes a little square and you cannot see the writing on it.

What I did with this was that I put may be 15-20 of those squares in one of my pockets at a time (this was particularly easy especially during winter when I had big jackets with pockets on me). Every time I had a chance, I took one out of my pocket, read the writing on one side, and tried to remember the info on the other side without looking at it. If I remembered it well, I put it in my other pocket. If I wasn't sure or correct, then, I put it back into the same pocket. At the time, I used buses for transport quite a bit and the travel time on buses gave me a lot of practice time. You can do it wherever and whenever suits you. This activity is pretty flexible and is easy to personalise.

Have a day when you learn something new and useful today!

Tuesday, 10 April 2012

EASY POM POM TUTORIALS

There are different types of pom poms that are often used for decorative purposes and here, I will be sharing with you two videos using different methods and materials.

pom pom tutorial


Enjoy a day that is worth celebrating!


Sunday, 8 April 2012

HANDMADE RECYCLED PLAYGROUND EQUIPMENT

recycling ideas

I must admit I am in love with this design which doesn't originally belong to me. In my opinion, it has it all: use of recycled items, fun, functional, unique, would put a smile on any kid (or adult) any time! 

I have not tried it myself yet but it doesn't seem to be an extremely challenging project to work on. I am definitely looking forward to coming up with my own design (or Mr. Junior may like to design it by himself). 

Enjoy something that makes you smile today!

Saturday, 7 April 2012

DID YOU KNOW ...? (20)

Each year, around 9 million children die from preventable and treatable illnesses before reaching their fifth birthday. Many die during their first year of life. 

Friday, 6 April 2012

A FABRIC FLOWER TUTORIAL

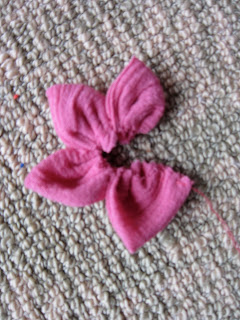
I enjoy working with fabric and coming up with different designs for fun. One of the things you can do with fabric is flowers. This is one of the many very easy fabric flower styles that even your children can achieve a great result of by themselves (be mindful of needles).

To make a flower similar to below, you can easily use some scrap fabric pieces. You can use various types of fabric and the size is totally upto you too. Even for the same flower, you may prefer to have different sizes of petals (eg. one large, one small, one large, one small and so on). Especially a small to medium sized flower can easily be formed by putting 5 petals together but you can change the number of it if you see the need for it. There is not many right or wrong options with this project. 

Note: Please excuse my poorly taken photos.

pink fabric
1) Cut out a circle shaped fabric piece (You will need about 5 of them in total)

making fabric flowers
2) Fold the circle in half 


easy fabric flower pattern
3) Fold it in half once more so that it forms the above shape and stitch the wider/open end

flower tutorial with pictures
4) Hand stitch the fabric flower petals

DIY fabric flower
End result


Thursday, 5 April 2012

RICE SALAD

rice salad recipe

This is an easy to make salad that is not only tasty but is also very healthy.

Ingredients:

Pilaf/pilav
Boiled peas
Grated carrots
Gherkin slices
Finely chopped dill
Lemon
Salt
Olive oil

Once your rice/pilaf is cooked, put it aside to cool down and in the meantime, you can prepare the rest of your ingredients. Once they are all ready and cooled down, mix them all together and add your dressing lemon, salt and olive oil to taste.

This makes a great side dish or lunch even on its own. You can make your pilaf the day before and mix the rest on the day of serving. You can also use your leftover rice (preferably pilaf) to make this salad.

Have something fresh and healthy today!

Monday, 2 April 2012

HEIGHT PREDICTION

Below is an estimation guide that is based on the genetic factor. Here is how you can estimate your child's adult height.

Based on the genetic factor, you can estimate your child's adult height by adding Mom's and Dad's heights (in inches), dividing that number by two, and adding 2.5 inches for boys or subtracting 2.5 inches for girls.

Another rule of thumb is that a person's height when full grown is double his height at the age of 3.

Have a fun Monday!