Monday 11 September 2017

Guest Post: How to Replace a Leaky Shower Head Like an Expert

How to Replace a Leaky Shower Head Like an Expert

A leaky shower faucet is a problem that should be dealt with sooner rather than later. The constant dripping of water from a worn-out shower head can waste a huge amount of water over time. This adds an unnecessary expense to your household energy bill that can be easily avoided.

Shower leaks are usually caused by the wear and tear of an old shower head. As a shower head begins to dry out over time, it becomes brittle which weakens its ability to hold in water. If your shower head won’t stop dripping, it’s best to buy a shower head replacement and fix the problem yourself.

Fixing a leaking shower faucet by yourself is actually a quick and easy task. All you need is a few basic tools, and you’re ready to go. Follow these simple steps to replace your leaky shower head like an expert.

1.     Examine the leak
Determine whether or not you feel confident doing this task yourself. Even though it’s a relatively easy problem to fix, if you don’t feel confident in your abilities you should call in a plumber to ensure you don’t cause any further damage.


How to replace a leaky shower head


2.     Gather all Tools
If you decide that you’re up for the job, there are a few basic tools you will need to replace your leaky shower faucet, including an adjustable wrench, a blanket or towel, some Teflon tape, and a new shower head. These items are available at most home improvement stores.


DIY at home


3.     Turn Off Shower
Make sure the shower is turned off completely and check that the knobs are secured tightly. It’s usually not necessary to turn off the water supply when replacing a leaky shower faucet with a new one.

DIY projects in the bathroom


4.     Lay Down a Blanket or Towel
Next, lay down a blanket or towel on the shower floor. This will stop any small shower head bits from accidentally falling down the drain. It will also protect the floor surface from any falling materials and tools.

How to replace a leaky shower head


5.     Remove the Shower Head
Take your wrench and grip it around the notch of your existing shower head. Most shower heads can be easily loosened up and removed by giving it a few counter-clockwise turns. If you’re finding it difficult getting the shower head off, make sure that you are gripping the wrench at the very end of the handle to get more torque. But don’t give it too much force. You should always be careful with the amount of pressure you use when making electrical and plumbing repairs.


Tutorial on how to change a shower head


6.     Remove Excess Material
After removing the old leaky shower faucet, you may notice some excess material like dirt, plumber’s tape around the pipe or leftover rubber gaskets. Using a rag, remove all the excess material and residue so that you can get a clean new start.


Step by step - how to change a shower head

7.     Wrap the Shower Arm with Tape
The next step is to wrap the threads of the shower arm with a couple layers of Teflon tape. Wrap the tape as tight as you can in a clockwise direction so that the threads are embedded properly. Smoothen out the tape along the threads using your finger.


How to replace a leaky shower head


8.     Attach the Replacement Shower Head
Take your brand-new shower head and insert it onto the shower arm. Using your hand, twist it clockwise as far as it can go to secure it into place. Make sure not to over tighten the shower head, as this can cause damage. This simple procedure is used no matter what type of replacement shower head you are attaching.


DIY home projects

9.     Turn on Water & Check for Leaks
Now it’s time to see how successful your shower head replacement project has been. Turn the shower back on and check for any leaks around the seal of the shower head. If you do find leaks, turn the shower off again and reapply the Teflon taping. Try tightening the shower head a bit more and test it again, but make sure not to over tighten it.


Shower head replacement tutorial
Blogger Tricks

Saturday 15 July 2017

'Thanks for Being a Part of My Family' Party

Recently, I have been to Steve Biddulph's 'Raising Boys' seminar in Melbourne. He gave lots of examples to prove his points but one of the most 'stuck-to-mind' details for me was on how families have changed over time and how it shows its effects on different units of the family, wider community and the world in general.


Regardless of what a family is to people these days or how families are formed, the concept of a family is important to individuals' lives and the world's today and the future in general. I'd like to think that my children also know the importance of a family.


I have been extremely quiet in the social media world including here on the blog recently and it has taken me over a year to be able to post something that is actually from the last year or even perhaps the year before. However, as I was going through my 'drafts', I didn't want to pass this without sharing.


This day symbolises to me that 'being a family' is special to my children and that they are happy to be a part of our little family perhaps as much as we are. It holds a very special place in my heart that my little preschooler at the time asked for a party to celebrate the fact that we are a family and it is something to celebrate. The party/theme was called 'THANKS FOR BEING A PART OF MY FAMILY' as the kids wanted it.


The kids simply guided us on what kind of a celebration they wanted to have and since food is quite important to us, one of the highlights was naturally related to food. Kids chose the menu themselves and the photos above are some shots from the foods we shared on the day. There was also some gift giving that they sneakily added to the list of 'to-do' for the party and of course they had their own preferred 'gifts' that were listed too, which I had previously shared.

I hope you all appreciate whatever you have and you do show your appreciation in a way that suits you the best!

Thursday 2 June 2016

Recipe: Silverbeet and Egg

Here is a recipe that I have always loved. It may not be the most photogenic meal, however, it is very healthy and totally delicious. It also is a great alternative to use large amounts of silverbeet or spinach leaves. Don't forget, those leaves can also be lightly blanched (or even raw if desired), cut into pieces and frozen in the freezer for later use. No more excuses not to include silverbeet and/or spinach in your diet anymore! 

Silverbeet or spinach recipe

Ingredients: 
Lots of onions, caramelised in olive oil,
Pepper paste
Cherry tomatoes
Silverbeet (or spinach)
Eggs
Salt and black pepper to taste

Method:
Sautee onions in oil. Add paste. Add silverbeet leaves and sautee until nicely caramelised on low to medium heat. Add cherry tomatoes and keep stirring only for a  further few minutes. Add salt and pepper and mix well. Turn off heat, crack as many eggs as you wish (as a rule of thumb, I suggest one egg per person) and close the lid. The eggs will cook in its own heat in the pot. Once eggs are in the consistency that you like, you can serve.
Enjoy!

Homegrown silverbeet

Monday 23 May 2016

Lunchbox Ideas (8)

Here I am with more healthy lunch and snack options after a long break, I wish I could say after a long 'holiday', but it was rather a very busy period due to other commitments in life. Most of these lunchboxes were prepared with the seasonal fresh produce, mostly homegrown, at the time. I hope you find them inspirational.

1. Lunch and Snack:
* Potato salad (boiled potatoes, capsicum, fresh mint, seasoning of your choice)
* Apple
* Blueberries
* Home-grown mulberries
Healthy school lunch ideas

Healthy fruit snacks

 2. Lunch and Snack:
* Stuffed vine leaves
* Pineapple
* Blueberries
* Home-grown mulberries
Healthy lunchbox ideas for kids

3. Snack:
* Sorrel leaves (packed with Vitamins A, C and more. Click here to read more.)
* Homegrown tomatoes
* Cucumbers
Sorrel, tomatoes, cucumbers

4. Lunch and Snack:
* Flat bread wraps with cream cheese, chia and sunflower seeds,
* Red capsicum sticks
* Strawberry
* Persimon
* Black grapes with seeds
Lunchbox ideas

To see the previous lunchbox ideas posts, you can visit:

#7
#6
#5
#4
#3
#2
#1


Thursday 7 April 2016

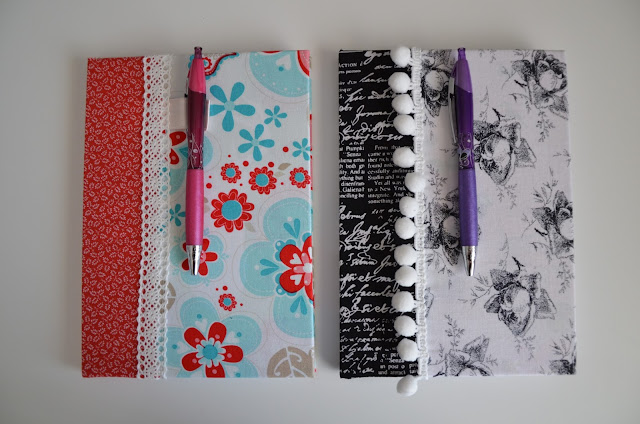
DIY Notebook Covers

I am over the moon about the fact that I am finally able to access to some of my photographs on my camera (I have been using my mobile phone's camera in the meantime)! The last time I was able to do so was approximately a year ago, so, it is one big fat YAYYY for me tonight! 

DIY notebook covers

These photos are of some of my fabric covered notebooks that I made for two lovely teachers of one of my children. These were relatively fun and quick projects to work on.  It was a good needed break from the sewing too. All I needed was some fabrics of my own choice, some decoration items such as pompoms, a hot glue gun and some scissors. 

DIY notebooks

The red one with the lace also has a little pink ribbon loop that not only looks good but is also functional. I particularly designed it for pens. The other notebook cover, the one in black and white, has pom poms, just for fun, of course. 

handmade fabric covers

I often really enjoy it when I can just look at my stash and come up with combinations and designs according to my taste and mood at the time. These were just that and they made lovely little gifts for teachers!

easy handmade fabric covers

handmade gift ideas

Thanks for stopping by and have a fantastic week!


Saturday 12 March 2016

1000 Piece Puzzle - The Stress Buster

As a mum of two, no, as an ordinary person and perhaps like everyone else, I go through some fun times or some stressful times in life for various reasons from time to time. I accept that it is a part of life and sometimes you can't do much about things (but, don't get me wrong, that doesn't necessarily mean that I gracefully and with open arms take them all in at all times). 

1000 piece puzzle

A few months ago, as I wasn't feeling the best emotionally, I needed something to take my mind off what has been bothering me. This 1000 piece puzzle came in handy at that time. I have actually totally forgotten about the puzzle which we had bought may be a year ago but it was just a perfect time for Mr Hubby to remember about it. I got working on it right away. 

African cheetah puzzle in progress

I have always been pretty fond of puzzles but I must admit, I had a few hiccups along the way. Firstly, I had set it on the floor when I first started it and that sure didn't agree with my neck and shoulder muscles (I surely looked forward to my weekly yoga classes more than ever before around then!). Then, I set it on the table but it took too much space and I chose to work on the floor again. Because I was unable to spend much time on it at a time as a busy person and a mother of two young children, it took almost a month before I could finish it. Therefore, it became a bit messy around the room. However, it was still totally therapeutic and I loved every stage of it. 

puzzle - getting there

Ever since I completed the puzzle, the kids started breaking parts of it here and there and working on it by themselves. At times 4-5 pieces, at times 40-50 pieces! (So, I have still not put it away yet). I think that is one of the most natural ways of teaching/learning and inspiring. 

African cheetah 1000 pieces puzzle

Enjoy something fun today!


Monday 22 February 2016

A Fabric Pencilcase and a Journey Back to Good Ol' Days

Do you remember your primary school years at all? Do you remember your first school bag for example, or your school shoes? How about your hairstyle? (Ok, I see, the hair style could be a topic on its own, I totally agree. Great to look at the family albums for a giggle but for now, forget about this last question, lets move on. )


When I was a child, which I don't know when and how became a 'history', people -if lucky- had one school bag, possibly for the rest of most or all of their Primary school years. We had school books and notebooks that we had to cover and put a name sticker/label on before school started. Most people had a few older siblings to receive help from but otherwise, parents or in later years, some friends would sit down and would cover them one by one for hours. The labels had cute little pictures and depending on our favourite subjects or books, we would choose our most favourite label and stick on that particular book etc. It was a lot of work (especially for the ones that were doing the main job) but so much fun too.


I also remember how precious our school items and belongings were to us. We would have only a very limited amount of pencils and rubbers and would look after them as if they were made of gold. Even the tiny little pencils were used until it was simply impossible to hold anymore.

I remember, most of us at the time used small prints in our hand writing so that our writing would look neat while saving space in our notebooks for future use.


I suppose those were the good old days. Now, things have changed.


I now see that consumption is the hidden word behind most conscious or unconscious behaviour and it starts even before the babies are born, with the parents indulging their unborn children, -or rather themselves perhaps- with  the best of everything they can afford. I mean afford as in 'buy' because it often means buying; the best furniture with the right colour combination and the perfect amount of contrast, tens and hundreds of cutest clothing pieces with often some expensive tags attached, the who-knows-how-many pieces of shoes that most babies won't even get to wear more than once and so on. And the list of what we buy for our kids regardless of the motives behind only grows with time.


Arguably as a result, I see that today's children are so much less caring with their blessings. It is often a 'given' that parents buy so many school uniforms (and seriously, what is it with the uniform prices these days? They are astronomic!) because things get 'lost' often. How about all those pencils and other stationary bits and pieces that never make it until the end of the year even though it looks like a life-time supply at the beginning of the year? If you are a parent of a student these days, I have a strong feeling that you know what I mean.


Anyway, the point is that the pencilcase in the pictures above is one of my son's many pencilcases. Some is too big for school, some is too small, some works perfect for the car trips, some is great for home. (Talking about indulging much?). By the way, in case you are interested in trying your hand at a small sewing project, or simply you just want to make your own customised pencilcases for your loved ones or yourself, there are many great tutorials on the internet. Don't roll your eyes, I promise, working with a zipper is not as hard as you have always thought. Just give it a go and see it for yourself.

Note: The colours of the pencilcase were chosen by Mr. Junior and I just added a few extra touches to it. I must admit, this one small pencilcase made him quite happy and proud (he loves it when he gets an opportunity to tell his friends that his pencilcase was made by his mum).